Showing posts with label Thermometer. Show all posts

Thursday, 14 January 2021

Arduino Projeler (LCD 16X2, DH11) Dijital Termometre Nem Ölçer Yapımı 003


DHT22 veya DHT11 sıcaklık ve nem sensörü serisinin iki versiyonu var. Biraz benziyorlar ve aynı pinouta sahipler ama farklı özelliklere sahipler.


DHT22, açıkça daha iyi özelliklere sahip olan daha pahalı versiyondur. Sıcaklık ölçüm aralığı -40 ° C ile + 125 ° C arasında + -0.5 derece hassasiyetle, DHT11 sıcaklık aralığı +2 derece hassasiyetle 0 ° C ile 50 ° C arasındadır. Ayrıca DHT22 sensörü daha iyi nem ölçüm aralığına sahiptir, % 0 – 100 arasında% 2-5 doğrulukla, DHT11 nem aralığı ise% 5 ile% 20 doğrulukla ölçüm yapmaktadır.


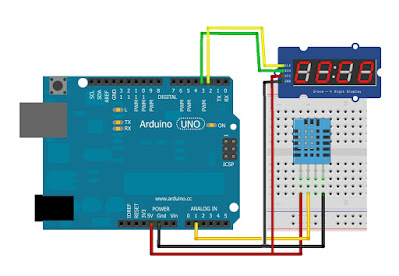
Arduino DHT22 ve 16×2 Karakterli LCD Bağlantısı

Aşağıdaki çizim, 16 × 2 karakter LCD’deki sıcaklık ve bağıl nem değerlerini yazdıracaktır. Değerleri LCD’de görüntülememiz dışında aynı kodu kullanacağız


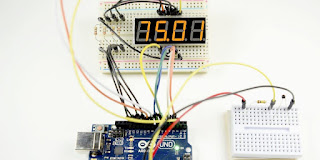
Arduino Projesi Olarak 16×2 LCD’li DHT11 ve DHT22

Sıcaklık ve nem seviyelerini izlemek istediğiniz bir fikriniz m var? Tam olarak doğru projeyi okuyorsunuz. Bu örnekte, LCD’yi DHT11, DHT22 sensörüyle birlikte Arduino’ya bağlayacağız.


indirme kod


PROJE VİDEOSU


Thursday, 7 January 2021

DHT11 sıcaklık ve nem sensörlü TM1637 Termometre Yapımı

Thermometer example: TM1637 4-digit 7-segment

 display with DHT11 temperature and humidity sensor


 4-Digit 7-segment displays are great for displaying sensor readings like temperature, humidity, voltage or speed. In the following example, I will show you how you can display temperature readings on the TM1637 display.

We will be using the popular DHT11 temperature and humidity sensor.

The wiring diagram below shows you how you can connect the DHT11 sensor in combination with the TM1637 display to the Arduino.

Note that the TM1637 display is connected in the same way as before.


Monday, 9 March 2020

4 Digit Thermometer using DS18B20 and PIC16F628A

Moty22.co.uk has a PIC16F628A based thermometer using DS18B20 digital sensor.

Counter based on PIC16F628A . Included C code and circuit diagram. Displays -55 to 125 centigrade. The temperature is read every 15 seconds, can be changed in the code. The math is using integers to calculate the degrees and the tenths of degrees are calculated separately.
The 7 segment LED is common cathode, 4 separate digits can be used with segments a to g linked.

Updated on 17/01/2016 (a and b segments were swapped on drawing)

Counter based on PIC16F628A . Included C code and circuit diagram. Displays -55 to 125 centigrade. The temperature is read every 15 seconds, can be changed in the code. The math is using integers to calculate the degrees and the tenths of degrees are calculated separately.
The 7 segment LED is common cathode, 4 separate digits can be used with segments a to g linked.
You are free to use the circuit diagram and the software with no limitations.


Circuit Description
See also Technical Tips

All transistors are BC337 or equivalent.
Total 5V supply current is 90mA.
The 4 digits display is common cathode, the 7 resistors of 220 ohms enable current of 15 mA for each segment which is on for 25% of the time. The seven segments, a to g, of one digit are linked to the corresponding seven segments in the other digits.
Segment e is connected differently because RA4 is an open drain output.
The 4 digits are multiplexed by pins 6-9 that drive the common cathodes cc1-cc4.
DP is the decimal point.
DS18B20 can be any type.

4 Digit Thermometer using DS18B20 and PIC16F628A – [Link]


Saturday, 7 March 2020

DS18B20 Thermometer using Arduino & 4 Digits 7 Segment Display


In this project we will learn how to design DS18B20 Based Thermometer using Arduino & 4 Digits 7 Segment Display. Simply we will interface Arduino with DS18B20 Digital Waterproof Temperature Sensor and display the temperature values in degree celsius on Common Cathode Display.


Live Weather Station using Arduino, RTC, Pressure & Temperature Sensor

Introduction:
A simple minor project as Live Weather Station using Arduino , RTC, Pressure & Temperature Sensor can be implemented easily. For example for viewing temperature we use thermometer and we don’t have any device to measure pressure, so we merely depend upon news. So here in this project we are going to develop a device that is capable of measuring temperature and pressure as well and after measuring it can be easily displayed in LCD with real time.


Tuesday, 3 March 2020

Digital Thermometer using Arduino and LM35 Temperature Sensor

Thermometers are useful apparatus being used since long time for temperature measurement.
 In this project we have made an Arduino based digital thermometer to display the current ambient temperature and temperature changes on a LCD unit in real time . It can be deployed in houses, offices, industries etc. to measure the temperature. This project is based on Arduino which communicates here with LM35 temperature sensor and a 16x2 display unit. We can divide this arduino based thermometer into three sections - 


Thursday, 4 July 2019

Arduino uyumlu 7 segment Termometre

SICAKLIK GÖSTERGESİ


Bu örnek bir termistörden sıcaklığı okur ve 4 basamaklı bir ekranda görüntüler.
Devreyi şu şekilde bağlayın:


Bir termistör kullanma hakkında sorularınız varsa veya yalnızca onlar hakkında daha fazla
bilgi edinmek istiyorsanız , bir Arduino ile bir termistör kullanma hakkındaki diğer eğitime bakın .
Her şey bağlandığında, bu kodu Arduino'ya yükle:
Bu sıcaklık Fahrenheit'te verilecektir. Sıcaklığı Santigrat cinsinden görüntülemek için,
 satır 28'i yorumlayın.
Kendiliğinden, sıcaklık bile biraz değiştiğinde ekran güncellenir. Bu can sıkıcı bir titreme yaratır. Bununla başa çıkabilmek için, her 300 milisaniyede bir (sadece 30 - 34 arası) 
termistördeki değeri okuduğumuz bir zamanlayıcı mekanizması sunuyoruz.
Sıcaklık değişkeni “T”, 35 satırındaki ekrana  sevseg.setNumber (T, 2, false); .
Umarım bu makale yedi bölümlü ekranları kullanmaya başlamanız için yeterli olmalıdır.
Diğer sensörlerden gelen okumaları görüntülemek istiyorsanız, yukarıdaki örnek program
 bunu yapmak için kolayca değiştirilebilir. Bu devreleri kurma konusunda herhangi bir sorunuz veya probleminiz varsa, yorum yapmaktan çekinmeyin.

W1209 termostatının hex kodudeğiştirilmesi

Böyle ucuz bir Çin termostatı W1209 var. Adil miktarda çeşitli Çin dükkanlarında satılıyorlar. Yararları - fiyat :). Kalan kısım kısmen yerleşiktir - yerleşik denetleyici -
 STM8S003F3 yeniden programlanarak düzeltilebilir.


Gerekenler: 
1) ST-Link / V2 programcısı. Veya herhangi bir STM8 Discovery kartı (orada yerleşik, kullanabilirsiniz). 2..4 $ içinde aliexpress için maliyet 
2) programcı için yazılım 
http://www.st.com/web/tr/catalog/tools/PF260219#(sürücü) 
http://www.st.com/web/ katalog / aletler / FM147 / CL1794 / SC1807 / SS1747 / PF210568(programlama yazılımı) 
3) programlama için 2,54 mm aralıklı bir tarak parçası (onsuz, basitçe lehimleyebilirsiniz) 
4) 0805 nominal değerli bir çerçeve büyüklüğüne sahip bir direnç. 
5) DS18B20 sensörünün kendisi.

Termometre kurulu resme göre yükseltiyoruz
şematik


Çip başlangıçta okuma / yazma işleminden korunur. Kilidini açmanız gerekiyor:

1) + 12v hizmet etmez. st-link'ten besleyin. 
2) programlayıcıyı çalıştırın. 
3) yazma girişiminde bulunmadan, verileri okumayı deneyin. (teoride bir hata olmalı) 
4) eğer öyleyse, seçenekler sekmesi (üçüncü program, ilk program var, ikinci program, üçüncü program, seçeneklerin üçüncü baytı) bu sayfaya geçin ve sayfayı yazın. 
5) çıkartmaya çalışın - eğer her şey normalse, çip sıfırdan okumaya başlayacak ve demir parçası tamamen çalışmayı durduracaktır

Saturday, 4 May 2019

Arduino Ile 7 Segment Display Termometre Uygulaması


arduino ile 7 segment display termometre yapımı


Malzemeler:
  1. Arduino
  2. 2 Adet 7 segment display
  3. DS18B20 sıcaklık sensörü
Elektronik Devre Şeması:
Aşağıdaki şekildeki devre şemasından gerekli bağlantıları yapalım.


Yazılım Kısmı:
7 segment display kütüphanesini aşağıdaki bağlantıdan indirin.
Display Termometre Uygulaması


KOD;


#include "SevSeg.h"
  
SevSeg sevseg;
  
int tempUnits = fahrenheit;
  
int refreshTime = 5000;
  
unsigned long timer;
float celsius = 0, kelvin = 0, fahrenheit = 0;
  
void setup()
{
sevseg.Begin(0,2,3,4,5,6,7,8,9,10,11,12,13);
}
  
void loop()
{
sevseg.PrintOutput();
kelvin = analogRead(0) * 0.004882812 * 100;
celsius = kelvin - 2.5 - 273.15;
fahrenheit = ((kelvin - 2.5) * 9 / 5) - 459.67;
  
unsigned long mils=millis();
if (mils-timer>=refreshTime) {
timer=mils;
sevseg.NewNum(tempUnits,(byte) 2);
}
}

Thursday, 14 February 2019

Arduino with water proof, 2 Wire temperature Gauge (PT100)

4 Digit Thermometer using DS18B20 and PIC16F628A

4 DIGITS THERMOMETER USING DS18B20 DIGITAL SENSOR

Updated on 17/01/2016 (a and b segments were swapped on drawing)
Counter based on PIC16F628A . Included C code and circuit diagram. Displays -55 to 125 centigrade. The temperature is read every 15 seconds, can be changed in the code. The math is using integers to calculate the degrees and the tenths of degrees are calculated separately.

The 7 segment LED is common cathode, 4 separate digits can be used with segments a to g linked.

You are free to use the circuit diagram and the software with no limitations. 


Circuit Description


All transistors are BC337 or equivalent.

Total 5V supply current is 90mA.

The 4 digits display is common cathode, the 7 resistors of 220 ohms enable current of 15 mA

 for each segment which is on for 25% of the time. The seven segments, a to g, of one digit are 

linked to the corresponding seven segments in the other digits.

Segment e is connected differently because RA4 is an open drain output.

The 4 digits are multiplexed by pins 6-9 that drive the common cathodes cc1-cc4.

DP is the decimal point.

DS18B20 can be any type