ÇEVİRİ
Mini Ev yapımı CNC Makinesi Arduino + 28BYJ-48 Step motor nasıl yapılırBu mini CNC yaklaşık 100mm X 100mm komplo vardır, ben bu makine inşa etmek için 28BYJ-48 Step motor kullandım L293D Motor kalkan ve arduino tarafından bu step motorlar sürücü Bu makine, tüm gerekli talimatları kendi içinde inşa etmek çok kolaydır gönder, yeni bir şey almak için kendi fikirlerinizi deneyebilirsiniz. Bu makineyi oluşturmak için düzenli olarak kullanılabilir donanımları kullanıyorum, sadece yaratıcı olmak için herhangi bir üst uç bileşeni satın almaya gerek yok.
Watch the complete video it covers all the necessary instruction to build this mini CNC machine
Material required (Hardware & Software)
Hardware


Software;
Arduino IDE (Version 1.6.3) (https://www.arduino.cc/en/Main/Software)
Processing IDE (Version 3.0.2) (https://processing.org/download/?processing)
Inkscape (version 0.48.5) (https://inkscape.org/en/download/)
Go to link to download the particular software select software pack according to you system
**NOTE:- Inkscape version must be 0.48.5 only other wise gcode extension will not work.
Role of Hardware & Software in this Machine
It is good to know role of each component and software in CNC machine
1) ARDUINO
Arduino is basically work as a brain of CNC Machine a CNC code uploded to arduino so that when Gcode stream to arduino Arduino commands motor shield to run stepper motors.
2) L293D Motor shield
This is dedicated shield to control verities of motor with arduino here this shield control two stepper motor(x-axis & y-axis) and one servo motor,https://cdn-learn.adafruit.com/downloads/pdf/adafruit-motor-shield.pdf read this for detail technical knowledge.
3) Servo motor
Basically this motor is used here just to UP/DOWN pen servo is connected with motor shield
4) Arduino IDET
his is used to upload code to arduino
5) Processing IDE
This is used to stram G-CODE to arduino
6) Inkscape
This is used to make G-CODE file of any image
Makine Birleştirmesi
(Machine Assemble)


Gerekli tüm bileşenleri monte etmek için Ahşap levhada delik açın.
Burada 5mm kalınlığında ahşap sac kullanıyorum ve X-ekseni ve Y eksenini monte etmek için delikler açtım
(Make hole in Wooden sheet to mount all necessary components.
I have used here 5mm thick wooden sheet & drill some holes to mount X-axis & Y-axis)

Üzerinde X-Eksen Kılavuz rayına sığacak şekilde Dört Akrilik tüp takılıyorum.
(I have mount Four Acrylic tube to fit X-axis Guide rail on it.)

Bisiklet yaklaşık 3mm teller konuştu Eksen için kılavuz ray olarak kalın metal teller kullanılır. Platform yapmak için sürgülü DVD sürücü platformunu kullandım.
sürgülü düzenlemeyi, gerektiğinde çok yumuşak bir şekilde kayacak şekilde ayarlayınız ve emniyete alınız.
(Bike spoke wires approx 3mm Thick metal wires are used as guide rail for axis. To make platform i have used sliding platform of DVD drive. adjust and secure sliding arrangement in such way that they can slide very smoothly if required apply some lubrication on guide rails)
Step motor ve avara kasnağı gemiye monte edilir.Step motor, sürgülü platform ve idller kasnağı GT2 triger kayışı ile bu şekilde bağlanır.X-acxis kurulumu tamamlandı.
(Stepper motor and idler pulley are mounted on board
Stepper motor , sliding platform & idller pulley are connected with GT2 timming belt in this wayinstallation of X-acxis is completed.)

Y ekseni düzenlemesini monte etmek için oluklu kanalı dikey olarak kurdum.Slottedd kanalları bu amaç için çok iyidir, Y ekseni yükseklik wrtini gerektiği gibi X eksenine ayarlayabilirsiniz.
(I have installed slotted channel vertically to mount Y-axis arrangment.
Slottedd channels are very good for this purpose you can adjust Y-axis height wrt to X-axis as required.)
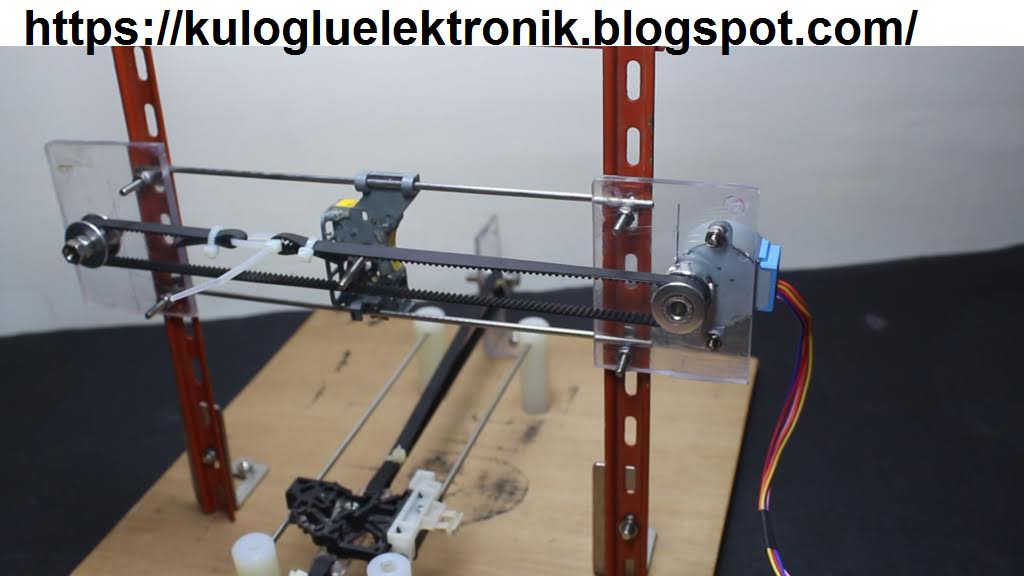
Y ekseni tahrik mekanizması, X eksenini kurduğumuz gibi aynı şekilde monte edilir
(Y-axis driving mechanism is installed in a same way as we installed X-axis)

Kayma sürtünmesiz olmalıdır ve hareket halinde pürüzsüz olmalıdır
(Slide must be friction-less and must be smooth in motion)

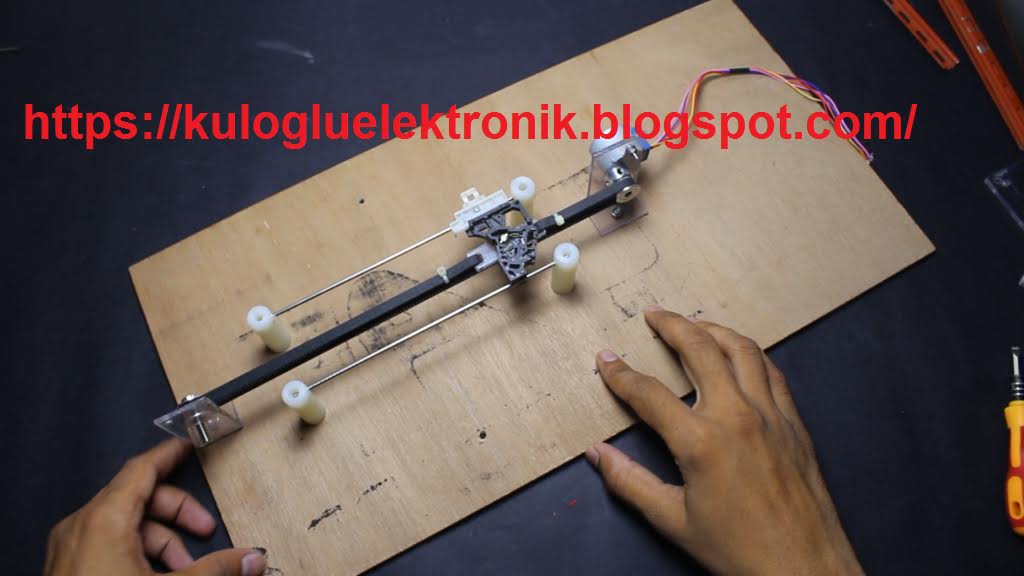
X ekseni çizim tahtasını karton parçalardan hazırlayın ve X ekseni platformunda yapıştırın.
(Prepare a X-axis drawing board from cardboard pieces and glue it on X-axis platform.)

Kalem mekanizmasının, DVD mekanizmasının bazı kısımlarından yapılmış bir Z ekseni olarak takılması
(Installing pen up down mechanism as a Z-axis made from some parts of DVD mechanism)

Kalem yukarı ve aşağı yapmak için Z ekseni üzerinde bir mini Servo takın
(Attache a mini Servo on Z-axis to make pen up and Down)
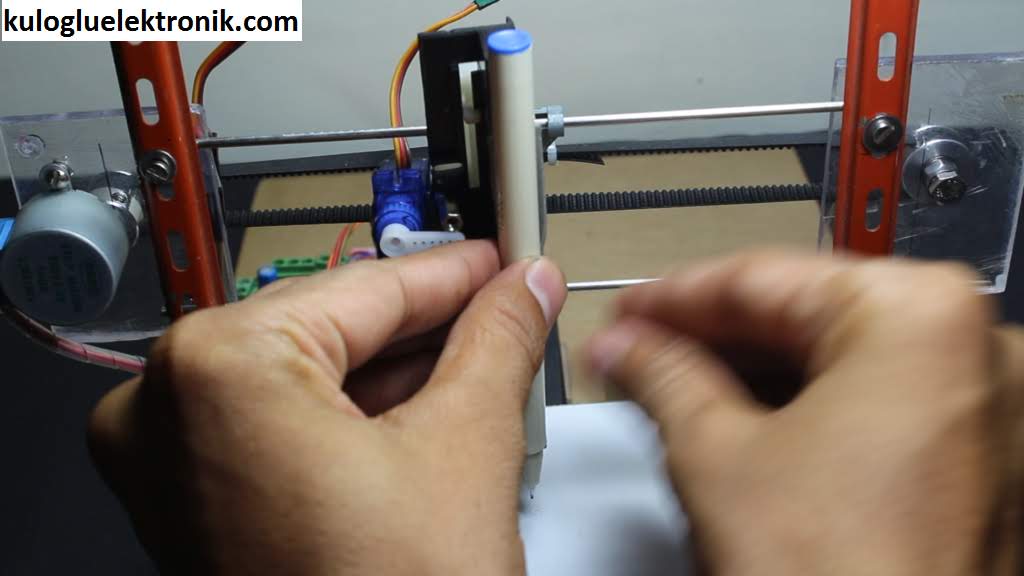
Z eksenine kalem takılması,
(Attaching pen on Z-axis,)

Motorların kablolaması için ihtiyacınız olan her şeyi çizim panosuna bir plan kağıdı yerleştirin.
machne'a kod yüklemek, bir sonraki adımda bu kodu nasıl yükleyeceğinizi görelim.
Kablo Çizim
(Place a plan paper on drawing board befor plote anything you need to do wiring of motors &
upload code to the machne let see how to upload those code in next step.)
Wiring Drawing

Connect X-axis at M1 & M2 Port of L293D Motor shield
Connect Y-axis at M3 & M4 Port of L293D Motor shield
Very important remove that power jumper from the L293D motor shield board
Apply 9V DC 1 amps power supply to the L293D Motor shield board
Place motor shield on Aruino UNO board.
Connect arduino with PC via USB cable
Read next Step to know how to load code to arduino
Programming Arduino
Now your machine is ready its time to give life to you machine
So we need to program arduino
Here we are using L293D Motor shield, so it need to add some library (AFMOTOR LIBRARY) to arduino IDE Software
so first download & upload this library to
Download Adafruit motor shield Library
Then upload this CNC Code to arduino
After successfully compiling and uploading your arduino programming part is over now move towards G-CODE
Preparing G-CODE
G-code is the format of file which your machine can understand and work acordingly
Suppose you have to draw some text with machine so you need its Gcode so what you do
Inkscape software provides you a facility to convert image or text into G-code
how to convert file in G-code watch video n
How to add this extension to Inkscape
1) Unzip the file
2) Open the folder by double click
3) Copy all the sub folders & files
4) Right click to the inkscape icon from desktop
5) Go to Properties
6) Go to open file location
7) Open “SHARE” folder
IDE işleniyor
Arduino'muz hazır, makinemiz hazır ve g kodumuz da yazdırmaya hazır.
Bu yüzden, G-kodunu Arduino'ya aktarabilecek bir şeye ihtiyacımız var, işte burada GCTRL Prosesini işleme koyduk
Aşağıdaki linkten GTRL kodunu indirin
GTRL'yi indirmek için tıklayın
GCTRL Kodunu indirdikten sonra klasörü açmak için gctrl kodunu yükleyin ve oynat düğmesine basın
Bu pencereden açılan yeni bir pencere ile iletişim portunuzu seçebilirsiniz.
“G” ye basarak bir tarayıcı açılır, g-kod dosyanızı seçin ve yükleyin.
dosyayı yüklediğiniz anda Makine başlangıç çizim
İşte bazı hazır g kodu dosyası ekli
İlgi arkadaşların için teşekkürler
Umarım CNC makinesinin nasıl yapılacağının her noktasını kaparım.
Bu makineyi iyi bir şans arkadaşına sahip olmaya çalışıyorsanız, bunu takdir ettiğinizi umarız
Aralarında herhangi bir yere sıkışmış olmanız durumunda temas kurmaktan çekinmeyin.
Bu konuda herhangi bir şeyi geliştirmek için yeni bir fikriniz varsa lütfen bizimle paylaşabilirsiniz hoş geldiniz.
Teşekkürler, görüşürüz
Youtube kanalımıza abone olun


2 comments:
hiç bir şey anlaşılır değil, yarım yamalak ve çarpıtıcı
This is my first time i visit here. I found so many interesting stuff in your blog especially its discussion. From the tons of comments on your articles, I guess I am not the only one having all the enjoyment here! keep up the good work CNC router
Post a Comment