Showing posts with label sensor. Show all posts

Monday, 4 January 2021

Arduino 4-Digit & RTC module Clock

4-Digit Clock based on a RTC module

I have got a DS1302 Real Time Clock Module with Battery Backup, and I was eager

 to making a digital clock. As I also had a 7-segment 4-digit display, I was looking for the best way to make that clock. But I was always reluctant to use this type of display, because of the amount of wires it requires.

Then, "digital tube" 4-wire 4-digit display came across, and I knew that was the solution I was searching for. Now I had all the pieces of my little system.
Saturday, 14 March 2020

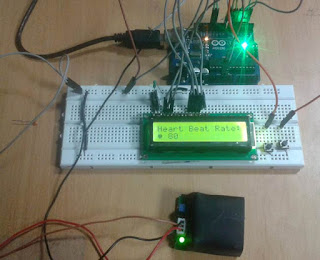
Arduino Tabanlı Kalp Atışı Modülü

Kalp atış hızı , vücut ısısı ve kan basıncı izleme, insan vücudunun çok önemli parametreleridir. Doktorlar ateş veya vücut sıcaklığını kontrol etmek için termometre, kan basıncı ölçümü için BP monitörü ve kalp atış hızı ölçümü için nabız monitörü gibi çeşitli tıbbi cihazlar kullanır. Bu projede, bir dakika içinde kalp atışı sayısını sayan Arduino tabanlı bir kalp atışı monitörü inşa ettik . Burada , sensöre parmağınızı koyduğunuzda kalp atışını algılayan bir kalp atışı sensörü modülü kullandık.

Friday, 13 March 2020

Ultrasonic distance sensor

This was a great buy, easy to wire up and surprisingly accurate, when I measured up to 3 metres.
I found another blogger who had created the code.
The ultrasonic distance sensor and pin layout.


Arduino - PIR MOTION ALARM

Hello world! Today i made a simple and very cheap to build alarm System with a keypad, pir sensor, relay and a very loud alarm strobe. You have 30 seconds time to leave the room after activating the alarm system, of course this can be changed in the code to less or more seconds. Now it has been set to 30000 milliseconds.
You can change it at this line in the code:
const int timeDelay = 30000; //give yourself time to leave the room

Follow the next step for the Schematic, Code & Parts list.

Saturday, 7 March 2020

DS18B20 Thermometer using Arduino & 4 Digits 7 Segment Display


In this project we will learn how to design DS18B20 Based Thermometer using Arduino & 4 Digits 7 Segment Display. Simply we will interface Arduino with DS18B20 Digital Waterproof Temperature Sensor and display the temperature values in degree celsius on Common Cathode Display.


Live Weather Station using Arduino, RTC, Pressure & Temperature Sensor

Introduction:
A simple minor project as Live Weather Station using Arduino , RTC, Pressure & Temperature Sensor can be implemented easily. For example for viewing temperature we use thermometer and we don’t have any device to measure pressure, so we merely depend upon news. So here in this project we are going to develop a device that is capable of measuring temperature and pressure as well and after measuring it can be easily displayed in LCD with real time.


Friday, 6 March 2020

Ultrasonic distance finder circuit

The circuit described here uses ultrasonic oscillations and operates based on the propagation velocity of these oscillations in the air. Thus, we can easily determine the distance of two points if the time within which the wave travels this distance is measured. There are three main categories of distance measurement methods in use: a) By mechanical means. b) By optical means. and c) By electronic means. Almost all methods are based on some form of radiation such as radio waves, light, sound, or infrared radiation. Given the propagation rates of these radiations, distance measurement is a matter of determining the wave transition time from one point to another. Infrared radiation is mainly used for long distances (in the order of a few kilometers) since it is relatively easy to form. For distances over 100 km, electronic devices are used, but their effectiveness is influenced by factors such as atmospheric conditions and visibility. With the advancement of space technology, laser systems have been used in conjunction with electro-optical systems to determine the terrestrial and off-shore of artificial satellites.

Simple Metal detector circuit with CD4030

Basic metal searching circuit types

The practical detector metal circuits are divided into three basic categories:
BFO (Beat Frequency Oscillator). In this system there are two oscillators, one of which is constant and the other one has a coil as the coil for resonance. The frequency difference between two oscillators, as it is shown by a non-linear mixer of the two signals, varies during metal detection, remaining in the low-waist region of the audible spectrum. The user understands the existence of a metal by changing the frequency of the loudness, heard from the headphones, or by a loudspeaker.
TR/IB (Transmission/Reception/Induction Balance). Here is a transmitter and receiver, coupled with loose inductive coupling. The occurrence of metal in the subsoil alters the value of the inductive coupling. The result is signaled by the level change of the oscillator output signal.

Wednesday, 4 March 2020

Complete Guide for Ultrasonic Sensor HC-SR04 with Arduino

Description

The HC-SR04 ultrasonic sensor uses sonar to determine distance to an object like bats do. It offers excellent non-contact range detection with high accuracy and stable readings in an easy-to-use package. It comes complete with ultrasonic transmitter and receiver modules.


Tuesday, 3 March 2020

Smoke Detector using MQ2 Gas Sensor and Arduino


MQ2 Gaz Sensörü ve Arduino Kullanan Duman Dedektörü

Duman Dedektörleri  binalarda duman veya yangının tespitinde çok faydalıdır ve önemli güvenlik parametreleri de öyle. Bu DIY oturumunda, sadece havadaki dumanı algılamakla kalmayıp aynı zamanda PPM'deki Havadaki Duman seviyesini (milyonda bir

Wednesday, 3 July 2019

HOW TO MAKE IR SECURITY ALARM & A IR DETECTOR USING LM358

Bu projede, küçük bir modifikasyonla aynı devrede
IR Güvenlik Alarmı ve IR Dedektörünün nasıl yapıldığını göstereceğim. Gösterge için hem Buzzer hem de LED'i ekledik.

In this project i will show you how to make a IR Security
 Alarm and a IR
Detector with the same circuit, just with little modification.
 For the indication we have included both Buzzer and LED.


***Parts List***1. LM358
2. 7805
3. 8 Pin IC Base
4. 2 Pin Terminal Block - 2 No's
5. Female Header
6. IR Rx
7. IR Tx
8. Resistor (39 Ohm, 10K & 470 Ohm)
9. Ceramic Capacitor - 0.1uF
10. 10k Pot
11. Buzzer
12. Red LED


Devre şemasında gösterildiği gibi devreyi oluşturun.

***Çalışma***

a. Alarm KAPALI durumu: Tx devresinden iletilen sürekli bir IR sinyali olduğunda, Işık ve Zil Göstergesi olmayacaktır.

b. Alarm AÇIK durumu: Sadece IR sinyalini engelleyen Tx ve Rx devresi arasında bir engel olduğunda, zil ve LED AÇIK duruma geçer.

c. LED'in menzilini ayarlamak için potu kullanabilirsiniz.

Not: Devrenin daha iyi performans göstermesi için lütfen voltajı 4,5 ila 6 volt arasında kullanın.

Construct the circuit as shown in the circuit diagram.

***Working***

a. Alarm OFF state : When there is continuous IR signal transmitted from the Tx circuit there will be no Light & Buzzer Indication.

b. Alarm ON state: When there is an obstacle between the the Tx & the Rx circuit blocking the IR signal only then the buzzer & LED goes to ON state.

c. You can use the pot to set the range of the LED

Note : Please use the voltage range between 4.5 to 6 volt for better performance of the circuit.
****************************************************************************


***How to test***
After completion of the circuit, power the circuit with 9 Volt battery (Since we are using 7805) & let the IR Tx & IR Rx led face each other. When they are facing each other there should not be any LED or Buzzer Indication. Now introduce any obstacle between the IR Tx & IR Rx, When the obstacle is introduced there must be Light & Buzzer indication 

İÇERİK GİZLENMİŞ


Thursday, 14 February 2019

Arduino with water proof, 2 Wire temperature Gauge (PT100)

4 Digit Thermometer using DS18B20 and PIC16F628A

4 DIGITS THERMOMETER USING DS18B20 DIGITAL SENSOR

Updated on 17/01/2016 (a and b segments were swapped on drawing)
Counter based on PIC16F628A . Included C code and circuit diagram. Displays -55 to 125 centigrade. The temperature is read every 15 seconds, can be changed in the code. The math is using integers to calculate the degrees and the tenths of degrees are calculated separately.

The 7 segment LED is common cathode, 4 separate digits can be used with segments a to g linked.

You are free to use the circuit diagram and the software with no limitations. 


Circuit Description


All transistors are BC337 or equivalent.

Total 5V supply current is 90mA.

The 4 digits display is common cathode, the 7 resistors of 220 ohms enable current of 15 mA

 for each segment which is on for 25% of the time. The seven segments, a to g, of one digit are 

linked to the corresponding seven segments in the other digits.

Segment e is connected differently because RA4 is an open drain output.

The 4 digits are multiplexed by pins 6-9 that drive the common cathodes cc1-cc4.

DP is the decimal point.

DS18B20 can be any type


Monday, 30 July 2018

IR Sensor for Obstacle Avoidance KY-032 (AD-032)

This sensor is known variously as the Keyes, KeyesIR or Keyestudio KY-032.  It is the the functional equivalent of the IrBeady IR-08H, also known as the AD-032.  The sensor uses a four pin connector, The pins are labeled: EN (Enable), out (Output), + (Power) and GND (Ground).  There are also two potentiometers on the board and one jumper (see picture).


Saturday, 21 July 2018

RANGKAIAN SENSOR GERAK MENGGUNAKAN PIR DAN IC LM358

Sensor gerak  adalah sensor yang berfungsi untuk pendeteksi gerakan yang 
bekerja dengan cara mendeteksi adanya perbedaan/perubahan suhu 
sekarang dan sebelumnya menjadi listrik.

PIR (Passive Infra Red)
Sensor PIR (Passive Infra Red) adalah sensor yang digunakan untuk mendeteksi 
adanya pancaran sinar infra merah dari suatu object. Sensor PIR bersifat pasif, 
artinya sensor ini tidak memancarkan sinar infra merah tetapi hanya menerima
 radiasi sinar infra merah dari luar.